Live Event Operator Training - Event Day Manager
Who can use this feature
Live Event Operators
Supported features: Event Day Manager
Before You Begin
Refer to the table below to get familiar with common terms you will read and hear in the training course. Click on a term name to expand the table and read the definition.
The back end is where the Live Event Operator manages the event details (event title, date & time, encoder settings, starting/stopping events).
The front end is where viewers go to pay and watch content.
A Live Event container, aka a container, has all the information for that unique event. Each event has its own container.
Software that converts the signal from the camera into a video stream to be sent over the internet. Essentially this turns your phone/table/laptop into a broadcast studio.
A transcoder receives the video steam from the Encoder and displays it on the event page of the Vidflex site.
Same as television monitors. 720: HD, 1080: true HD, the bigger the number the bigger the screen. Affects Bandwidth.
This is how much of the video gets sent each second. Higher bitrate numbers mean better quality video is sent. Affects Bandwidth.
The amount of signal available to connect to the internet. A wired connection is always preferable but WiFi or Cellular usually works just fine. A combination of Resolution and Bitrate is what determines the amount of bandwidth required.
The default settings of the Vidflex platform are what we’ve found to provide a good balance between internet usage and quality of image on playback.
A test that measures the available internet bandwidth. Use the ‘Upload Speed’ number to help you find the best Encoder and Transcoder Settings. We recommend www.speedtest.net
Meaning: Digital Video Recording. Every live event container has its DVR setting enabled by default. After a live stream is over the 'DVR' becomes instantaneously available for viewing on-demand.
The "Go Live" button on a live event container, pushes the streamed content to the viewers on the front end.
Ending an event by clicking the "End Event" button once a container goes live, will trigger the DVR recording for on demand playback. This also ends the ability to continue streaming to this container, and will remove the "Live" status that viewers see.
Getting Started
Complete all the steps in order before moving on to the next section. We recommend that you read the steps below on another device or monitor so that you can follow the tutorial on this page.
- Install your preferred encoder software or configure your hardware encoder. Otherwise, download and install one of the free recommendations below:
Attempt Your First Stream
Run A Speed Test
Go to speedtest.net and note the “upload speed” you get from it. Use the information below as a guideline when deciding your bitrate. As a general rule of thumb, you want to have double the amount of upload speed than what is required to act as a buffer.
- If your upload speed is greater than 5 Mbps (5000 Kbps), you can stream a 720p HD resolution with a bitrate of 2500 Kbps
- If your upload speed is greater than 8 Mbps (8000 Kbps), you can stream a 1080p HD resolution with a bitrate of 4000 Kbps
- If your upload speed is less than 4Mbps there is potential for choppy or blurry video. To help prevent this from happening you need to lower the bitrate from your encoder. For more assistance see this help article
- [00:00:09] Run A Speed Test
- [00:00:27] Knowing Your Upload Speed
- [00:01:38] Users with Limited Upload Speed
- Upload speeds do not have to be exact. Try to stay within 500 Kbps to keep it safe
- In most cases we recommend streaming a 720p resolution @ 2500 Kbps for all events
- For users that have limited uploads speeds between 2 to 3 Mbps available, configure your encoder to stream a 720p resolution @ 1500 Kbps
Starting Your Test Stream
On Android it's possible to do all of the following steps with a single device. But, if you are streaming with Larix on an iOS device we recommend having another tablet, phone or laptop nearby to do the verification process.
The workflow outlined during your test stream, will be the exact same process as a real live event
Finding & Using Event Day Manager
You will find the Event Day Manager on the left hand side menu.
- Log into your admin account
- Under Channel Settings, click on “Event Day Manager” from the left menu
Interface Overview & Definitions
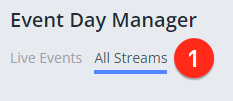
Event Day Manager All Streams View
Use the numbers shown in the 'Event Day Manager All Streams View' image above to correspond with the definitions in the table below.
Shows the list of scheduled events (5 at a time) for all persistent streams on that scheduled day, this list will automatically update as the events are completed
1. b). Live Events (default view):
Shows the list of scheduled events for the current date only, with video previews
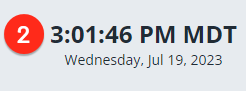
Shows the current date and time in your portals time zone
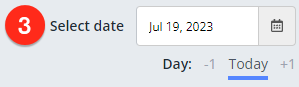
3. Select Date:
Allows you to view events from any day by using the custom selector, or the three presets below it: "-1", "Today" and "+1" which are relevant to the current date and time
Shows the current state of that persistent stream. "Enabled" or "Disabled"


Available on all interfaces in Event Day Manager, this button will open a pop up window with all your encoder settings information for your persistent stream

Note: The persistent stream will de-activate, and return to the "Disabled" state 60 minutes after no incoming data is detected from your encoder

Takes you to the individual view of that persistent stream, showing all its events for that day, and a stream preview.


Getting Your Encoder Settings
- To get your encoder settings, you can now click on the Encoder Settings button, inside any view of Event Day Manager.
Note for Larix users: To get your encoder settings into Larix, use the "Launch Larix" button in the top of the single Encoder Settings pop up, and continue the steps below
Note for all users: Your encoder settings will only need to be entered once for each persistent stream you are managing
- For OBS users and most other encoders, use the "Encoder Settings" pop up, and then use the copy to clipboard button next to the Stream URL and Stream Key, and paste each one into your encoder's output settings
-
Save the settings by clicking 'Apply' and 'OK' if you're encoder has it
- a) If using Larix, once you have clicked the "Launch Larix" from the Encoder Settings pop up, and follow the prompts
- Once your settings are imported into your Encoder, head back to your browser where you are logged into the platform, and click back into the "Event Day Manager" on the left hand menu
Starting an Event
- Click the “Enable Stream” button on your persistent stream. If you are more than 30 minutes away from your scheduled start time, click the “Enable Stream” button on your persistent stream. If auto-run is enabled, your persistent stream will auto enable itself 30 minutes prior to a scheduled event start
- Click "Yes” on the pop-up to confirm enabling the stream
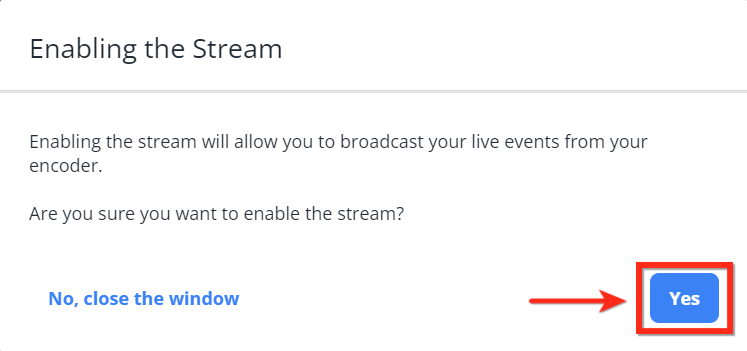
Note: Enabling the stream can take up to 2 minutes.
- Once your persistent stream is enabled, start streaming from your encoder
- Verify you can see and hear your stream within the Stream Preview player
- Click “Go Live” on your event
- Confirm the pop details and click “Go Live”
The "Go Live" button must be pressed in order for your event to be seen on the front end. It will not automatically go live at the Scheduled Start time.
- Monitor your stream from your encoder, and either the "Live Events" , "Stream Schedule", or the "Single Event" preview player(s)
Ending an Event
- When you are finished your test stream, click “End”
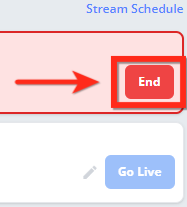
- After clicking “End” you will have two options for how to end your event:
- “End & Start Next Event” - This will end the current event and immediately make the next scheduled event live. Best used if events are back to back
- “End This Event” - This will end the current event. Best used if there is a large time gap between events
Note: The "End & Start Next Event" option is only available if there are subsequent events that day for you to manage
Video Tutorial
Optional Advanced Encoder Set Up
To get the best possible production value whether you're using a mobile device or on a computer, we recommend going through one or both of the links below. Select the Larix link if you're streaming from mobile, or OBS link if you're streaming from a computer.
Optimizing Larix Broadcaster on mobile devices:
Get a better understanding on how to use Open Broadcaster Software like a pro: